Rates Menu – Rate Plan
It has 5 tabs available: Active, B2C Presentation Order, BO Presentation Order, Inactive.
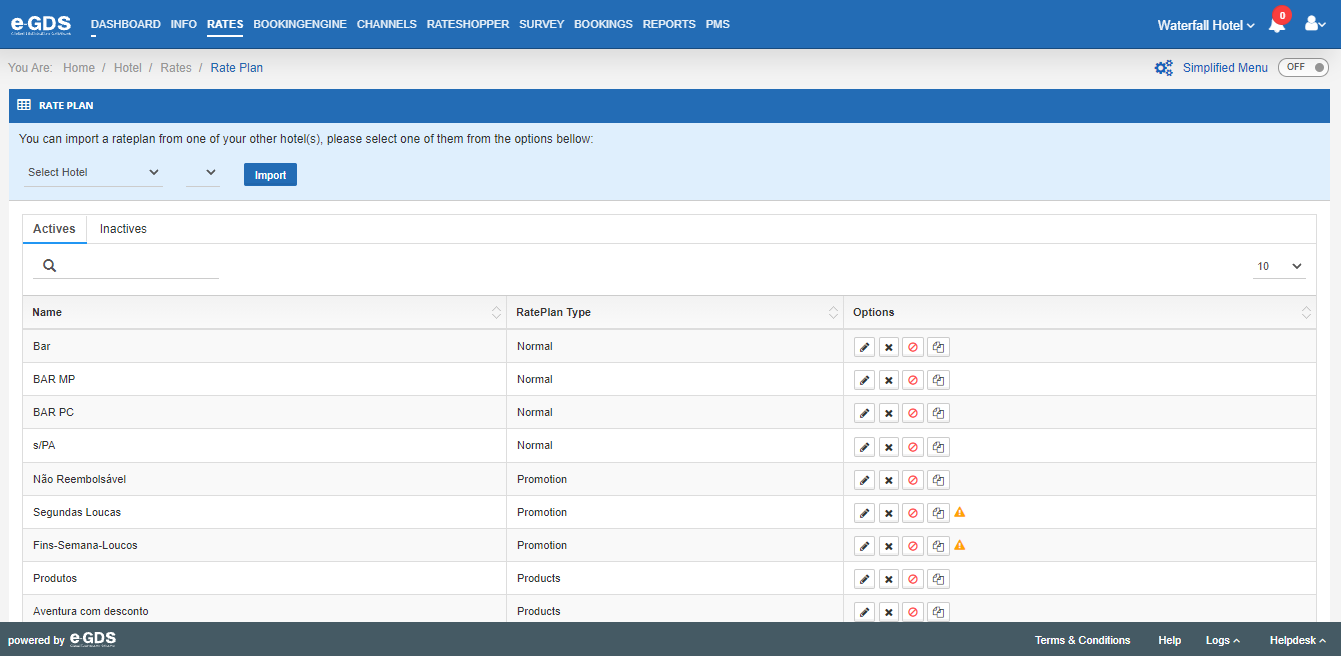
Active” tab – Finds all the schemes (RatePlan) that are active and in use.
Name – RatePlan name.
RatePlan Type – Information about what kind of Rate Plan it is.
Options – In this field you have access to the following options:
Edit – You can edit the RatePlan by accessing the Pencil,
Delete – pressing the “cross” deletes the RatePlan.
Deactivate – by pressing the “forbidden” button deactivates the RatePlan. After being deactivated, the RatePlan moves to the Tab – Inactive.
Duplicate – possibility to duplicate the information from an already created RatePlan.
Export Min/Max Stay – possibility to copy information sent from another RatePlan to the RatePlan in question. By selecting this option, you are directed to the area where you can choose which extranet you want to export the information from. You must indicate to which periods you want to export this information and finally select the “Export” command
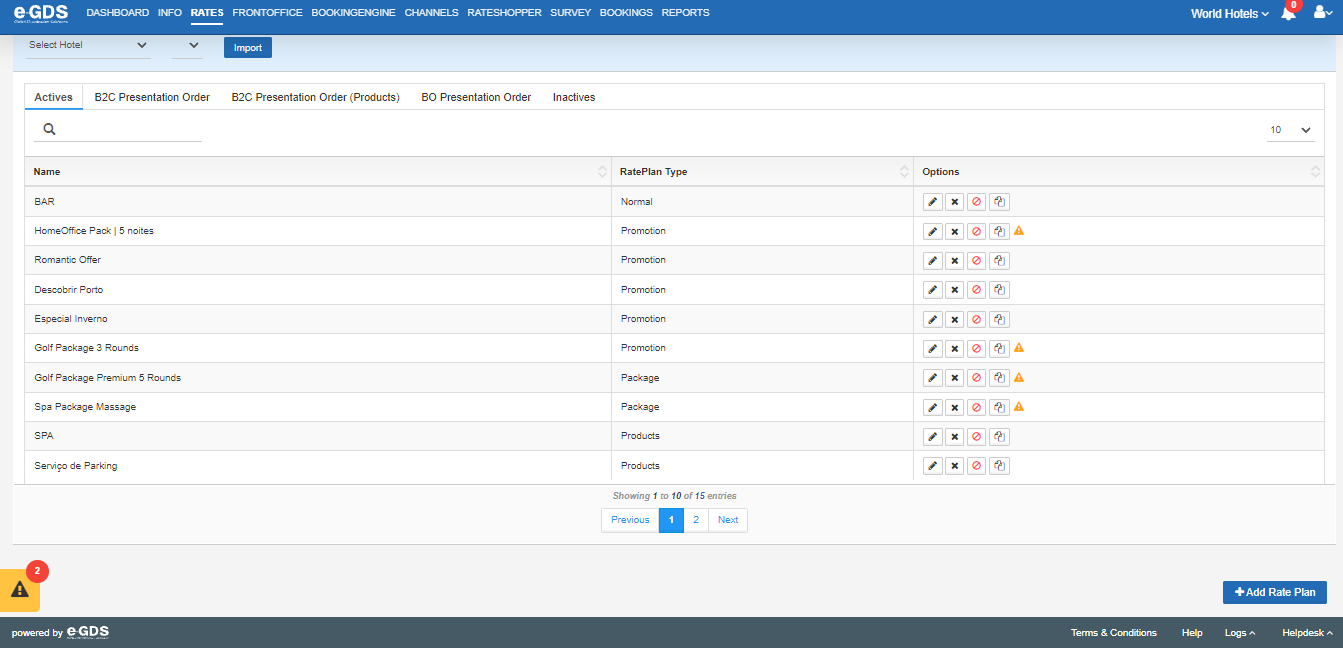
2. B2C tab Presentation Order – Possibility to change the order in which RatePlans appear in your BackOffice.
Group by – No grouping or grouping by RatePlan Type.
Sort by – Name, Price (Ascending or Descending) or Customize.
Display Order – Indicating the order in which the RatePlans will appear.
Name – Name of the RatePlan.
Discount – Information whether the given RatePlan has a discount associated or not.
RatePlan Type – Information about what kind of Rate Plan it is.
Options – In this field you can “Give Priority” by pressing the green arrow, this command implies passing the RatePlan to the place above the one it is at the moment; or “Take Priority” by pressing the red arrow, this command implies passing the RatePlan to the place below the one it is at the moment.
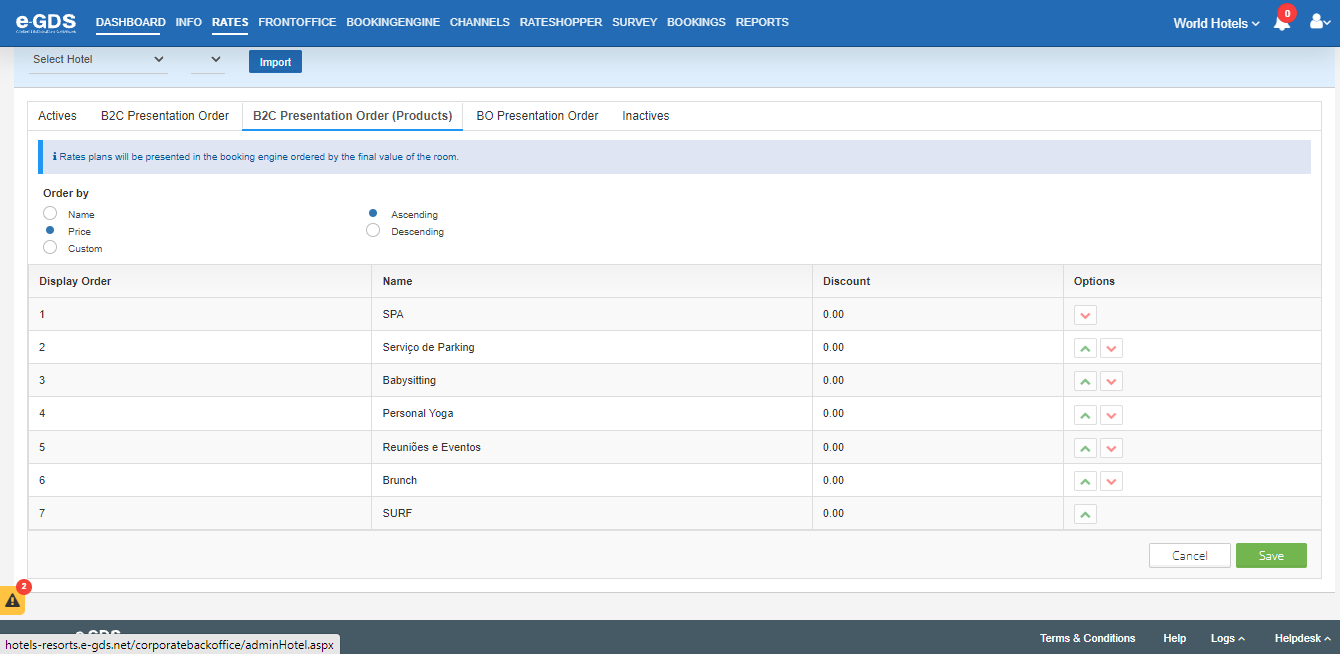
3. BO Presentation Order tab – Possibility to change the order in which RatePlans appear in your Booking Engine
Sort by – Name, Price (Ascending or Descending) or Customize.
Display Order – Indicating the order in which the RatePlans will appear.
Name – Name of the RatePlan.
Discount – Information whether the given RatePlan has a discount associated or not.
RatePlan Type – Information about what kind of Rate Plan it is.
Options – In this field you can “Give Priority” by pressing the green arrow, this command implies passing the RatePlan to the place above the one it is at the moment; or “Take Priority” by pressing the red arrow, this command implies passing the RatePlan to the place below the one it is at the moment.
4. BO Presentation Order tab – Possibility to change the order in which RatePlans appear in your Booking Engine.
Display Order – Indicating the order in which the RatePlans will appear.
Name – Name of the RatePlan.
RatePlan Type – Information about what kind of Rate Plan it is.
Options – In this field you can “Give Priority” by pressing the green arrow, this command implies passing the RatePlan to the place above the one it is at the moment; or “Take Priority” by pressing the red arrow, this command implies passing the RatePlan to the place below the one it is at the moment.
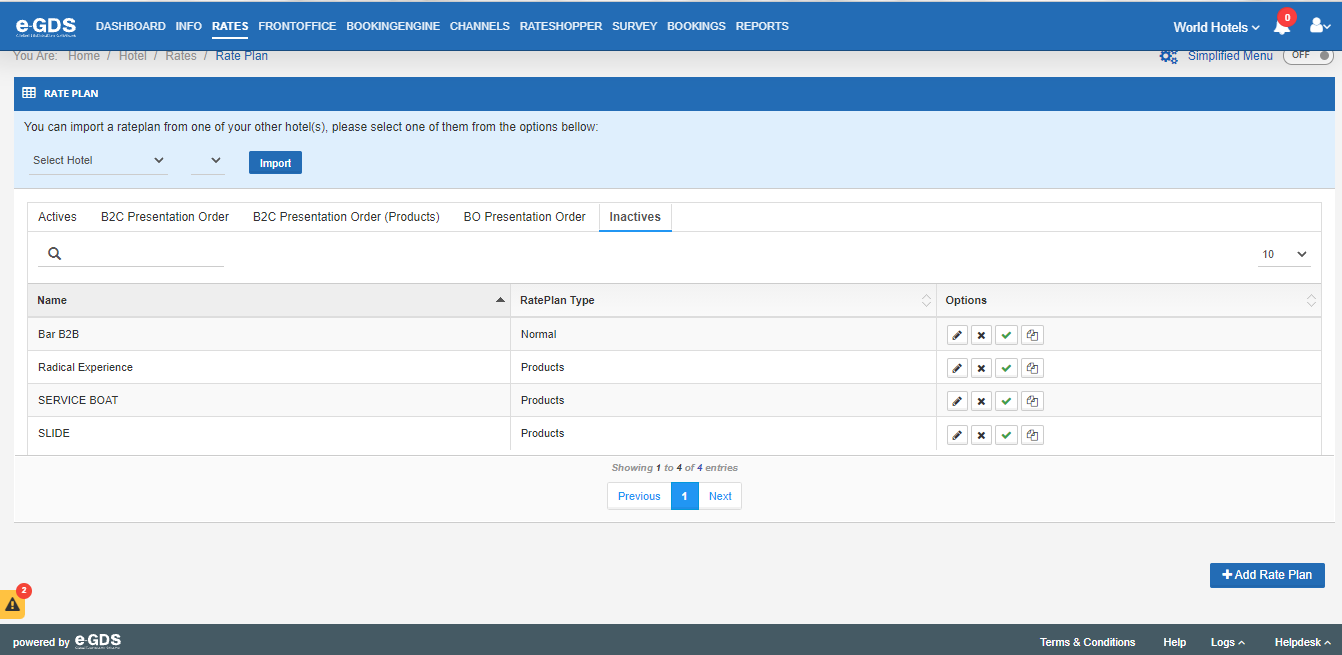
5. Inactive” tab – there are all the RatePlans that, despite being created, are not being used
You can activate them at any time. To activate a RatePlan, in the “Options” field, simply select the green arrow, and the RatePlan in question goes to the “Active” Tab.
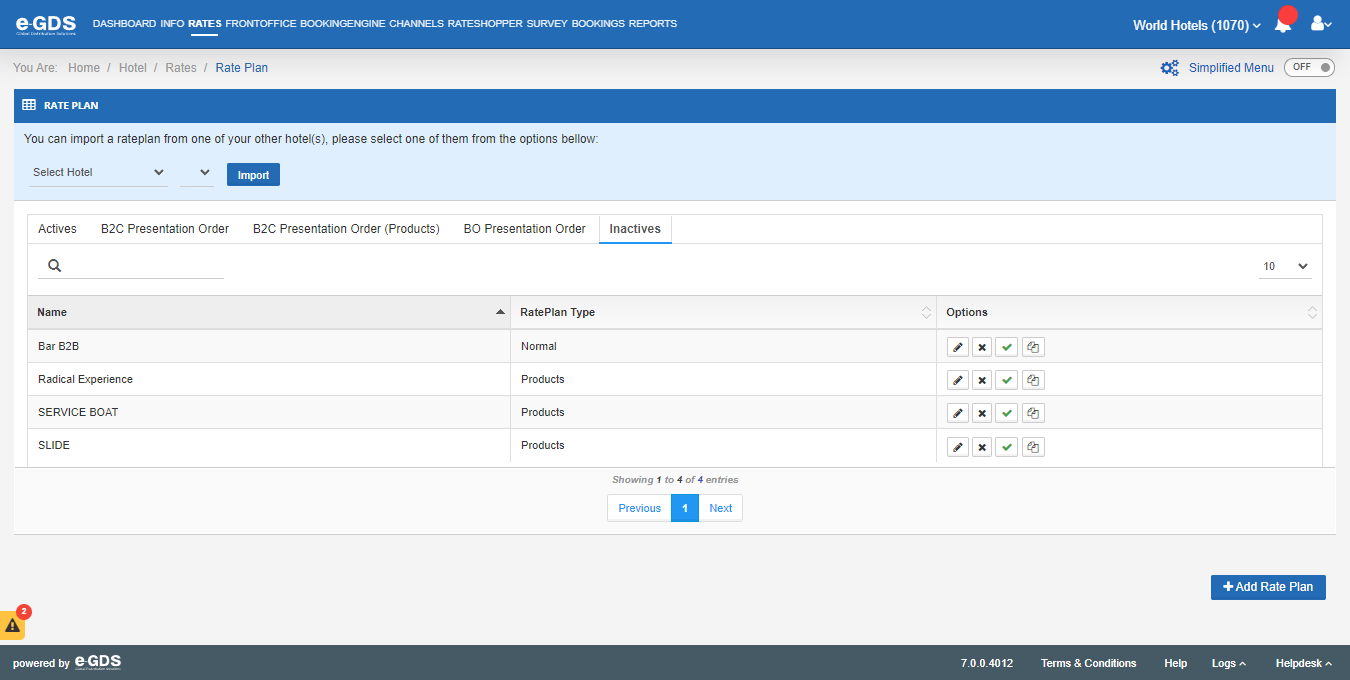
To Create a RatePlan you should use the “+Add RatePlan” command located in the bottom right corner of the page.
The “Add RatePlan” area consists of 5 tabs:
Rate Plan Information tab
RatePlan Type – In this field you can select which type of RatePlan you want to create. You have 5 possibilities:
RatePlan Normal
RatePlan Last Minute
RatePlan Package
RatePlan Promotion
Rate Season Name – Name you wish to associate to RatePlan
Discount – In case you wish to associate a discount to RatePlan
Discount Type – What kind of discount you wish to associate: Percentage or Value.
Min. Nights – In case you want to associate a minimum number of nights to be booked.
Máx. Nights – If you want to associate a maximum number of nights to be booked.
Only with Promo Code – You can create a RatePlan only to be used with a promo code.
Facebook only – You can create a RatePlan only to be used for bookings via Facebook
Mobile only – You can create a RatePlan only to be used for mobile reservations only.
Apply Profile Discount – Despite having a discount associated with Rateplan, you have the ability to not apply the discount.
Apply Derived Discount to Children – By default the discount is not applied to children, if you want it to be applied to children, just select this option.
Cancellation Policy – by default you have 4 possible cancellation policies, besides Customize.
Cancellations are only accepted up to X day(s) before arrival. In case of late cancellation or no-show, you will be charged X % of the reservation amount.
2. Cancellations are only accepted up to X days prior to arrival date. Any cancellation made after this time will be charged to the credit card for the first night.
3. No cancellations are allowed. Please note that if you cancel, modify or no-show, the total price of your reservation will be charged.
4. Free cancellation. No prepayment required.
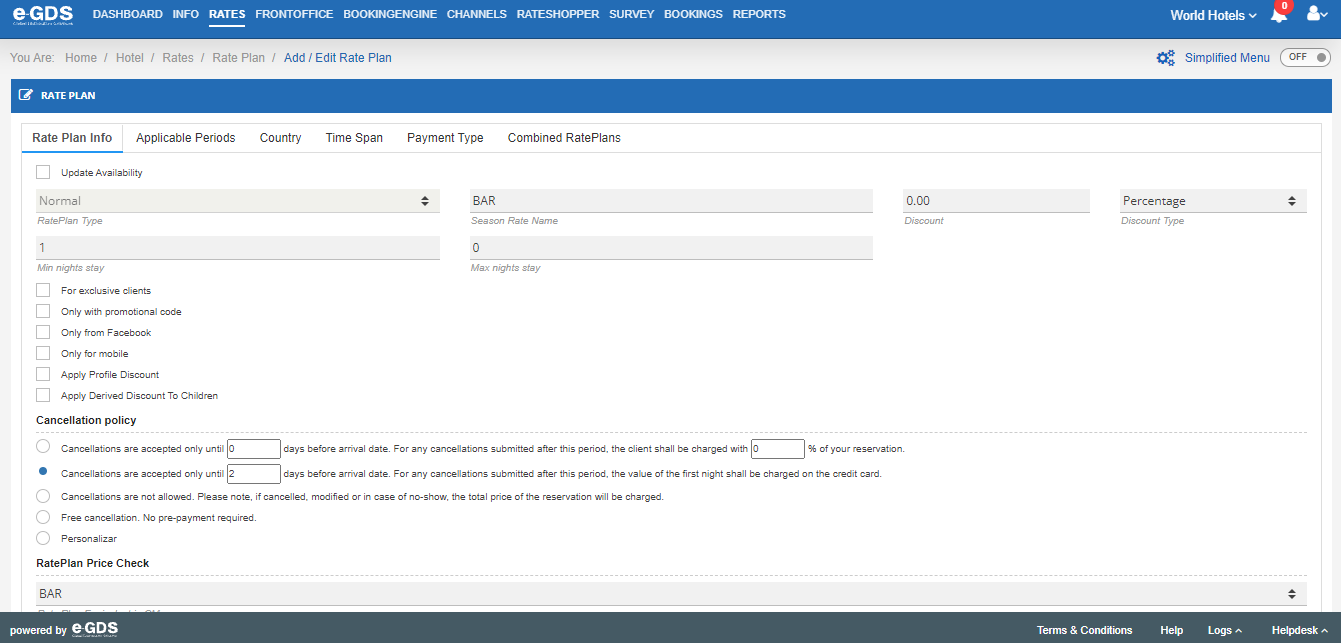
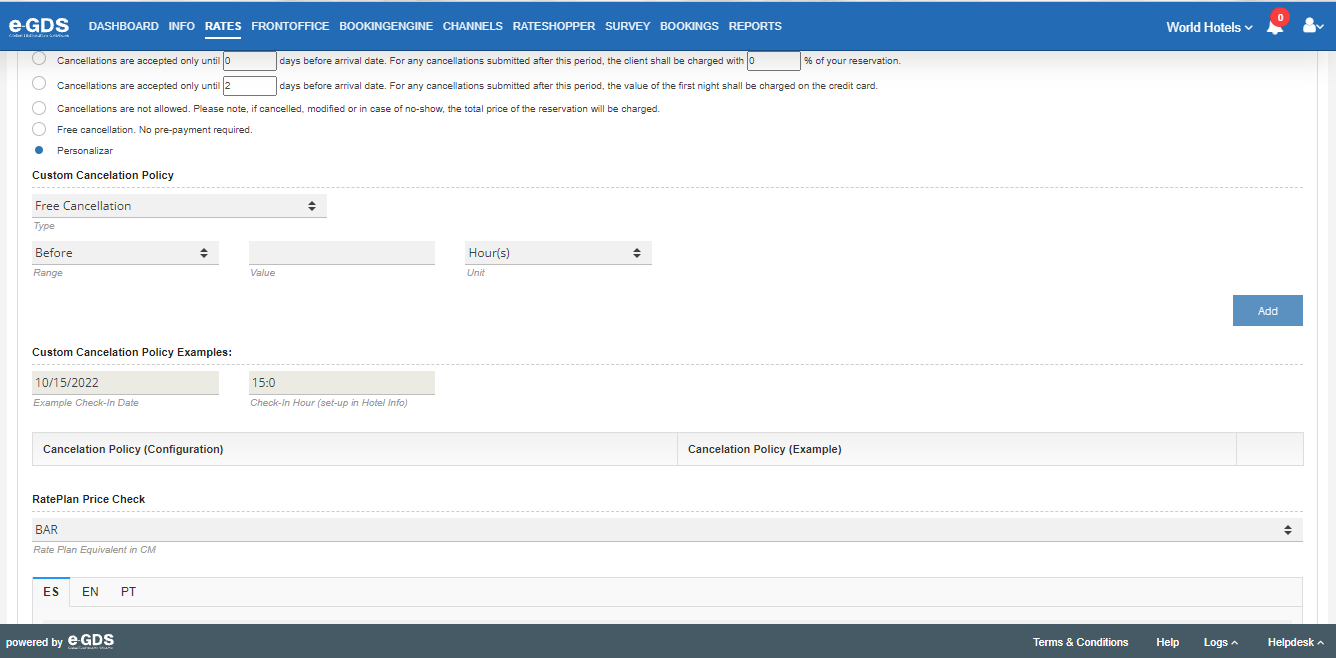
5. Customize – When you choose to customize the cancellation policy, you will need to set the fields below:
Custom Cancelation Policy:
Type: Free Cancelation (cancelamento gratuito) ou Pay (o cliente terá que pagar uma quantia caso cancele)
Value To Pay – amount to be paid in case of cancellation.
It can be a percentage or by amount.
And this value can be: from the total of the reservation (From Total), per adult (Per Adult) or, per adult and child (Per Adult and Children).
Range – Field to inform how far in advance the charge should be applied. It can be Before; After; Between or Always.
Value – Indicates the time (before, after, between)
Unit – Hours or Days – the value indicated above can be for days or hours.
To finish the customization just press “Add”.
After adding the Customized Cancellation Policy, the table will appear with the details applied.
In the fields below you should detail the cancellation policy.
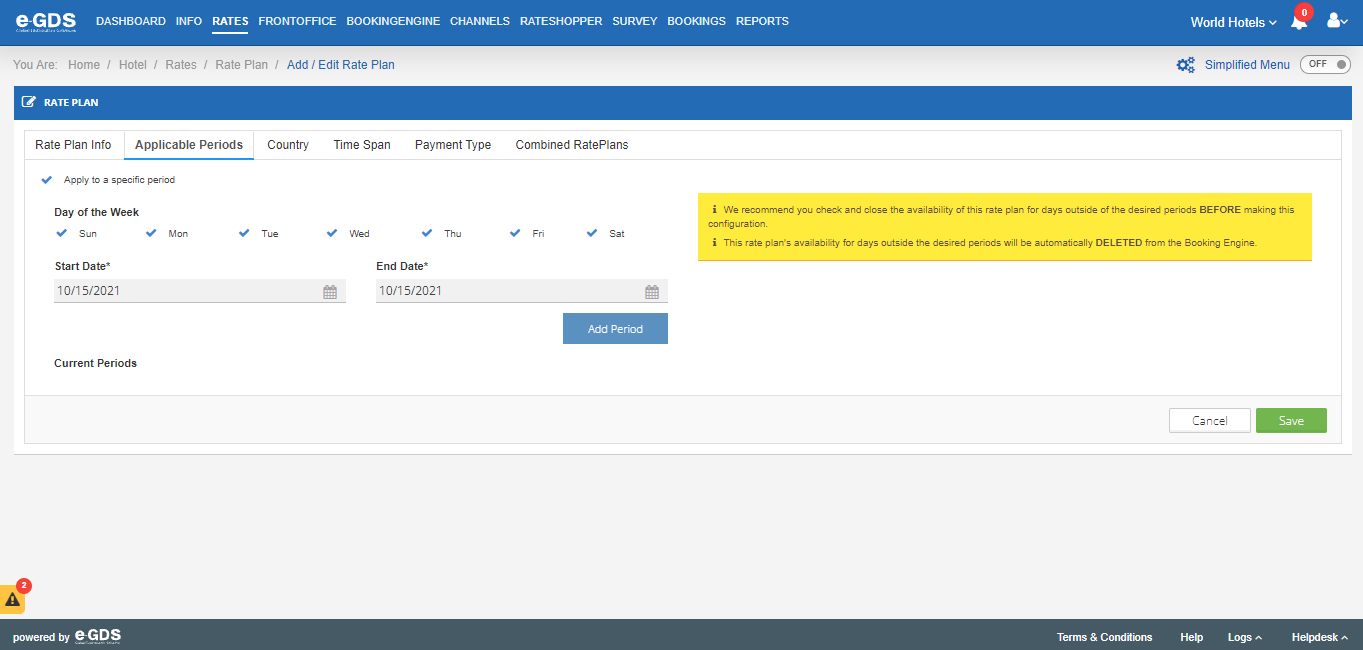
Applicable Periods tab
When creating a RatePlan you have the option to apply that RatePlan to a specific period. To do this, you must select the option “Apply to a certain period”. After that step, you will have to indicate the Start Date and End Date you want, and add period.
Note – We recommend that you check and close the availability of this scheme (Rate Plan) for the days outside the desired periods BEFORE making this configuration.
The availability of this plan (Rate Plan) for days outside the desired periods will be automatically DELETED from the Booking Engine.
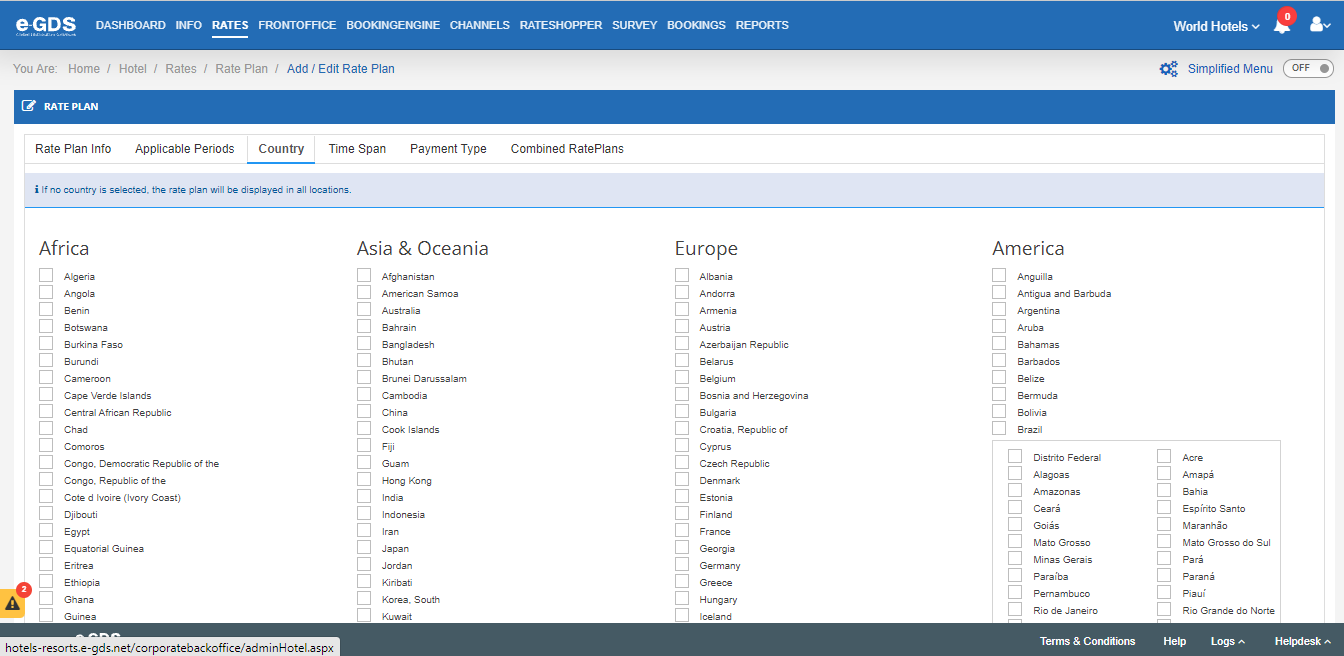
Country tab
You can create a Rateplan to be applied exclusively to one country (controlled by IP) by selecting the country from the list. If no country is selected, the RatePlan will be displayed in all countries.
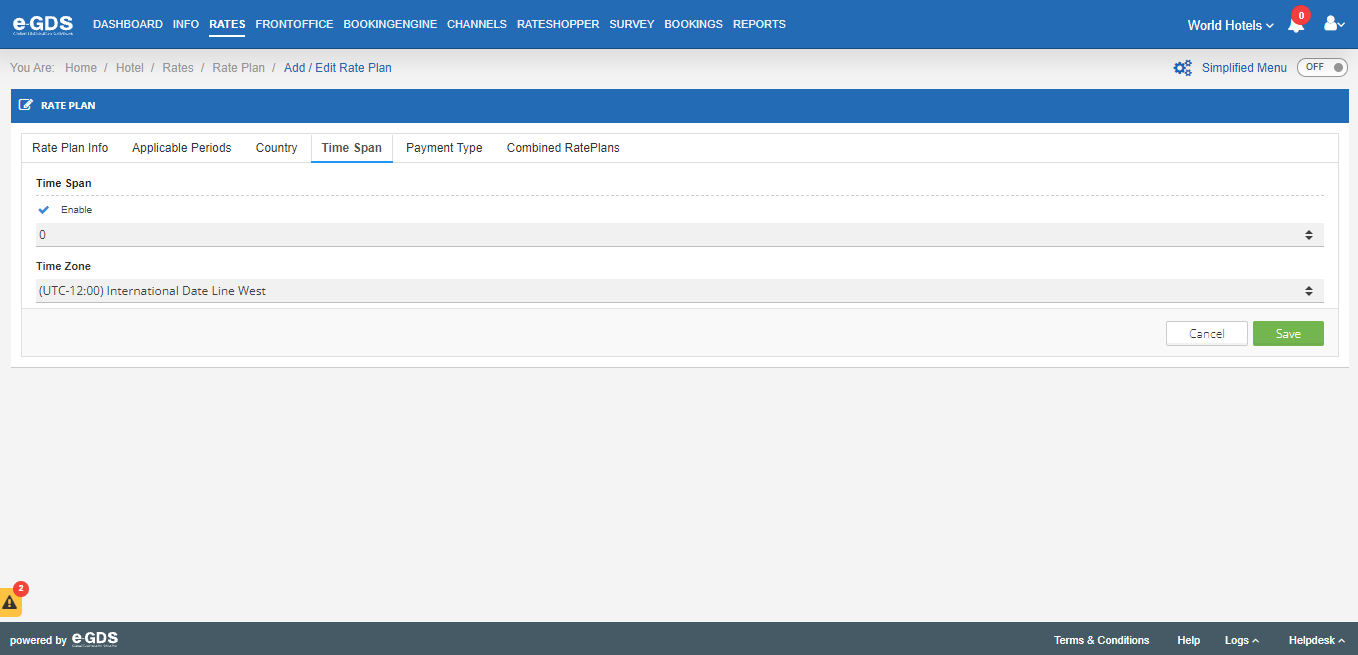
Time Span
By enabling the “Interval” option you have the chance to choose if you want RatePlan to appear once or twice a day.
Time Zone – Ability to choose in which Time Zone the RatePlan will be available.
Start Time and End Time – Time interval in which RatePlan will be available for reservation.
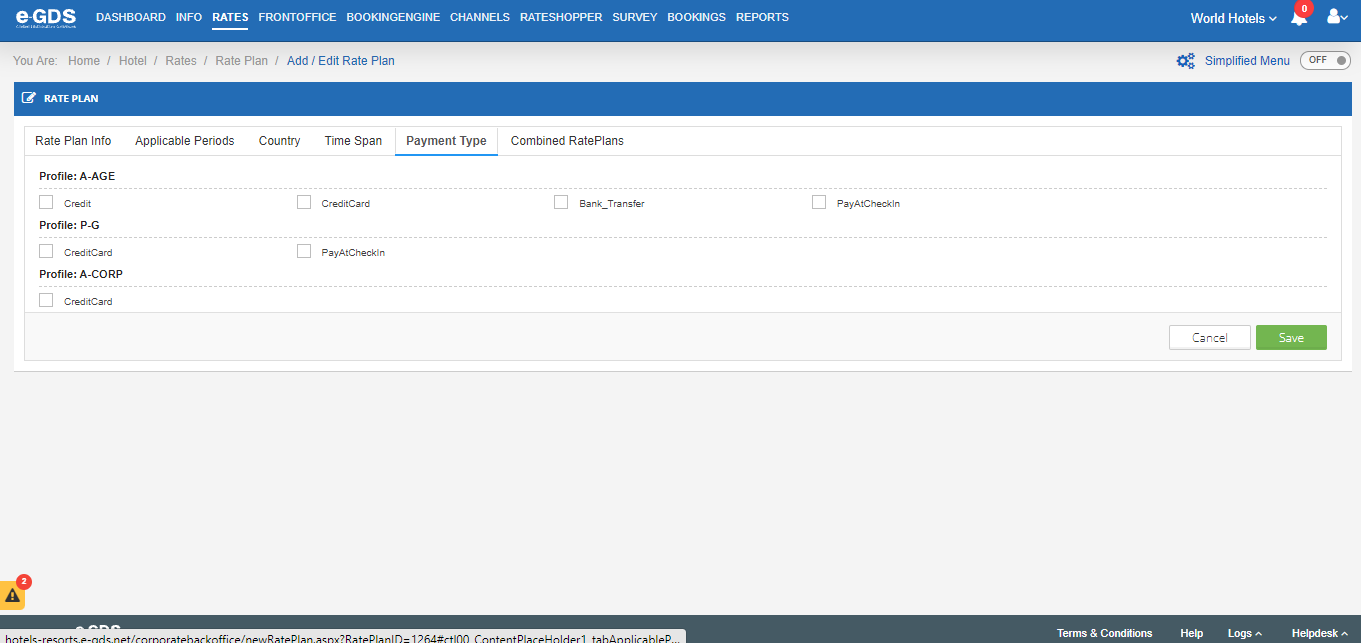
Payment Type Tab
You can choose which payment type you want for this RatePlan.
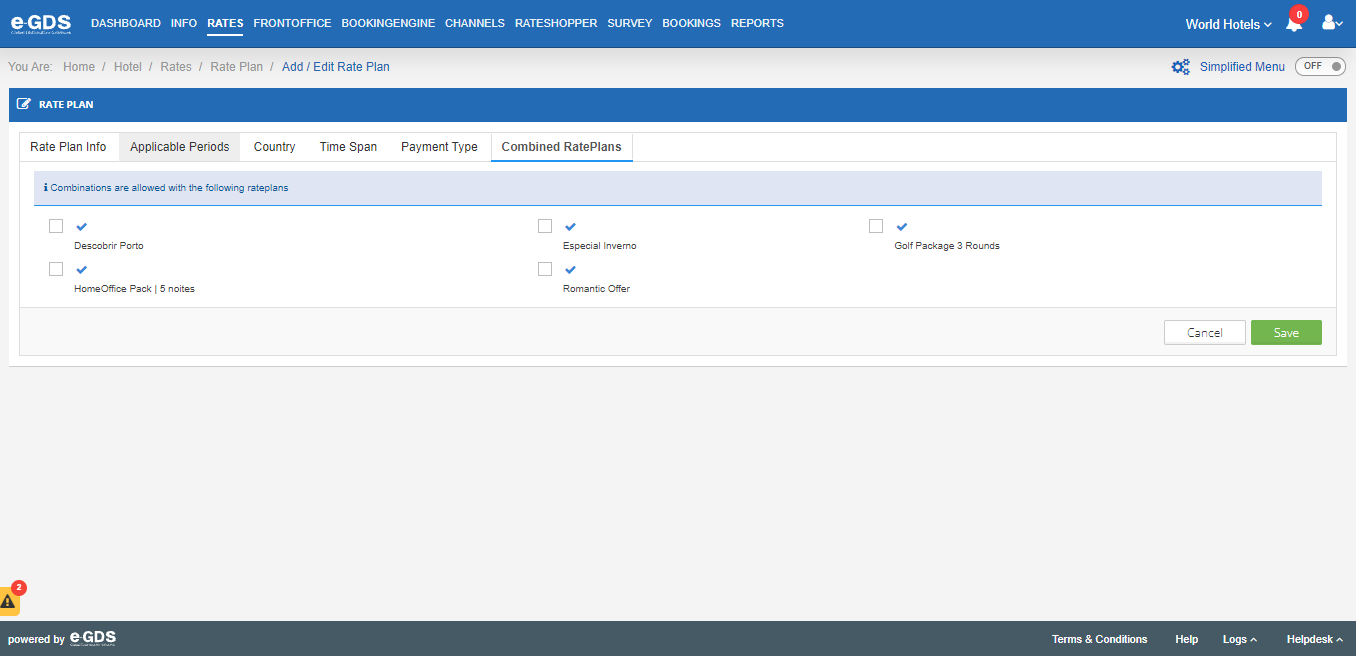
Tab Combined Rateplans
Here you can choose to select the Rateplans that will combine so that it is possible to combine and display as available two Rateplans in a period where one Rateplan ends and the other begins.
Questions
My Question